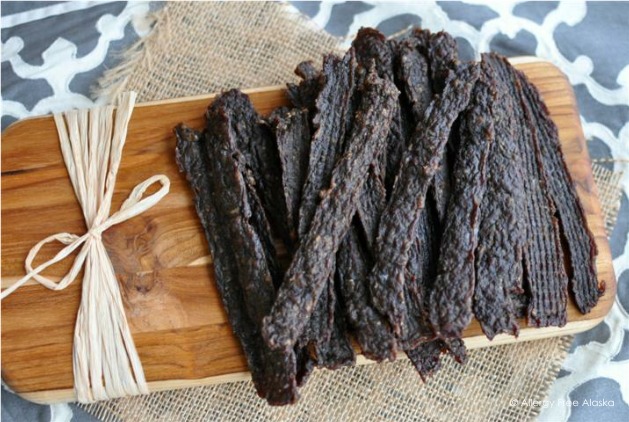
Although cheaper than store-bought, making homemade beef jerky can still be costly. It all depends on the type and cut of meat used. That’s why this ground beef jerky recipe is so popular with my readers. It provides a large quantity of beef jerky while remaining affordable.
I pay about $10-15 for 3 pounds of lean ground beef (here in Alaska, anyways). If you factor in another $2-3 for the beef broth, sea salt, and seasonings, I can fill a gallon-size bag about ¾ of the way full of jerky using this recipe for about $13-18. That's a lot of ground beef jerky for a great price!
If you enjoy this beef recipe, try gluten-free beef stroganoff, sirloin tip roast, bottom round roast, and Instant Pot chuck roast.
Making Jerky with Ground Beef
When I set out to create this ground beef jerky, I didn't want to use gluten-free soy sauce (otherwise known as gluten-free tamari) to flavor the meat, nor did I want to use coconut aminos as an alternative (I don't care for them and they can be expensive). So instead, I decided to try a beef jerky seasoning of beef broth, molasses, and liquid smoke. I couldn't believe how perfectly it all worked out; this beef jerky recipe is so flavorful without any soy ingredients!
Many readers have said they have successfully substituted the lean ground beef in this recipe with another lean ground meat, like deer, moose, or bison.
Purchasing a Jerky Gun
We own a metal jerky gun but have previously owned a plastic one. While the plastic jerky gun was much cheaper, it was highly frustrating and didn't work as well as the metal one.
You can make this ground beef jerky without a jerky gun, but I wouldn't recommend it. The jerky gun ensures consistent beef strips, while trying to form even strips by hand is nearly impossible.
Tips for Using a Jerky Gun
- Keep your meat cold! Cold ground beef will pass through the jerky gun much more accessible than meat at room temperature.
- Go for thinner strips vs. wider strips of beef jerky. They dehydrate quicker and are much easier to form (even using a jerky gun!).
Double vs. Single Nozzle
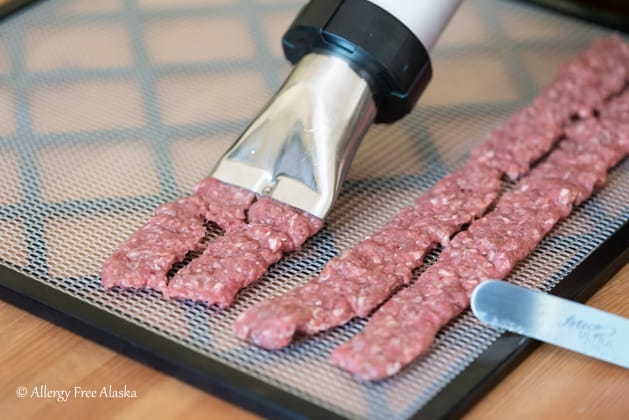
- If your jerky gun comes with a double flat nozzle (shoots out 2 strips of jerky at a time vs. one), stick to the single nozzle (shoots out 1 strip of jerky). The double nozzles tend not to push out the ground beef consistently, so you’ll get one thick strip of beef jerky and one super skinny one. Jerky strips at different thicknesses will not dehydrate evenly. Plainly said, the thicker jerky strips will need to dehydrate longer, while the thinner strips will dehydrate faster. As an example, here is a picture of the double flat nozzle. You can see that the strip on the right is coming out thicker than the strip on the left.
Loading The Jerky Gun
- When loading a jerky gun, instead of filling the entire barrel at once, push the plunger to the end of the barrel and gradually fill the barrel little by little. If you think of the jerky gun as a tube with a stopper that pushes the ground beef out (forward), push the stopper forward. Now pull the stopper back 2 inches, and fill the first 2 inches with ground beef; pull the stopper back another 2 inches and continue filling the jerky gun this way, little by little, until the tube is full. These steps eliminate air pockets in the ground beef jerky mixture. Air pockets cause the jerky gun to push out the ground beef inconsistently.
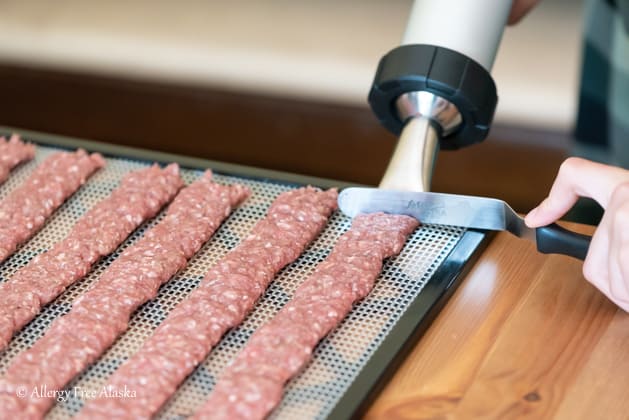
- Use a small offset spatula or a butter knife to cut off the flow of the jerky mixture from the jerky gun.
Using The Jerky Gun To Shoot Strips
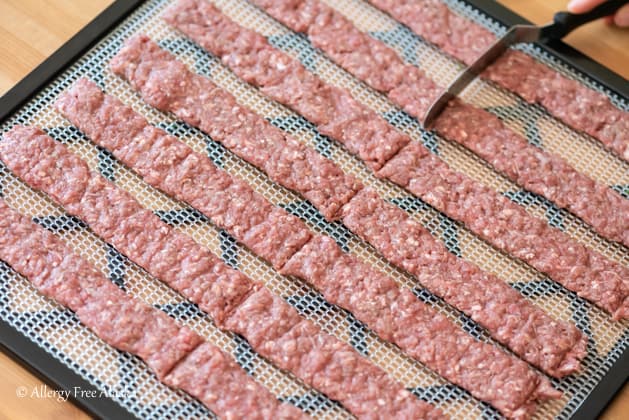
- My family prefers jerky strips about 5-6 inches long. Instead of shooting the jerky strips out of the jerky gun at this length, we shoot out 10-12-inch strips and then use an offset spatula or butter knife to “cut” the strips in half before dehydrating. This “cut” doesn’t penetrate all the way through, but it makes it easy to break the long strips in half once dehydrated.
Round Beef Jerky Sticks
You can use the round beef jerky sticks nozzle (or pepperoni sticks nozzle) on the jerky gun vs. the flat jerky nozzle (as seen in my pictures). The shape of your homemade jerky is a matter of preference. Also, the dehydrating time may vary with the different nozzles.
Making Beef Jerky in the Dehydrator
I use an Excalibur dehydrator (model 3926TB) with temperature control and a timer. This way, I can set the hamburger jerky to dehydrate and not have to worry about it going for too long and drying out (I do this knowing already about how long my Excalibur takes to dehydrate a batch of jerky).
Rotate your dehydrator trays once or twice during the dehydration process. This ensures all the trays dehydrate evenly.
It is essential to use lean ground beef (93% lean and 7% fat is perfect) to make this recipe. Any ground beef that is higher in fat will leave grease droplets all over the inside of your dehydrator.
Can This Ground Beef Jerky Recipe Be Made In The Oven
Dehydrating ground beef in the oven on the lowest temp might be possible, but I have yet to try it. I'm not sure if it will work. If you try, please return and let us know if you succeeded!
Storing Ground Beef Jerky
Consume gluten-free beef jerky within 12 hours at room temperature, or store it in the refrigerator in an airtight container for up to 7 days. For long-term storage, freeze in an airtight container and consume within 3-4 months.
This recipe was originally published in January 2014. Blog post and recipe card updated to include better instructions and notes April 2023.
Ground Beef Jerky Recipe
Although cheaper than store-bought, making homemade beef jerky can still be costly. It all depends on the type and cut of meat used. That’s why this ground beef jerky recipe is so popular with my readers. It provides a large quantity of beef jerky while remaining affordable.
Ingredients
- 3 pounds ground beef (use 97% lean/7% fat)
- 5 teaspoons garlic powder
- 4 teaspoons onion powder
- 3-4 teaspoons sea salt (we prefer 4 teaspoons)
- 2 teaspoons ground black pepper
- 1 ¼ cup beef broth
- 1 tablespoon Wright’s Hickory Liquid Smoke
- 2 teaspoons molasses
Instructions
- Place the ground beef, garlic powder, onion powder, sea salt, and ground black pepper in a large mixing bowl.
- Stir together the beef broth, Wright's Hickory Liquid Smoke, and molasses, and then pour it into the mixing bowl with the ground beef. Stir until well combined.
- Cover and marinate for at least 3 hours in the refrigerator.
- Form the meat into strips, about ⅛-1/4” thick, using a jerky gun, your hands, or a rolling pin to flatten the meat into strips or whatever shape you desire.
- Dehydrate in a dehydrator at 145 degrees (F) for 6-12 hours.
- Place the jerky strips on paper towels to cool and absorb any excess fat (if there is any).
- Consume within 12 hours at room temperature, or store in the refrigerator in an airtight container for up to 7 days. For long-term storage, freeze in an airtight container and consume within 3-4 months.
Notes
You must use lean ground beef. As the jerky dehydrates, the fat will seep, creating a mess if your ground beef is higher in fat.
Purchasing a Jerky Gun
We own a metal jerky gun but have previously owned a plastic one. While the plastic jerky gun was much cheaper, it was highly frustrating and didn't work as well as the metal one.
You can make this recipe without a jerky gun, but I wouldn't recommend it. The jerky gun ensures consistent beef strips, while trying to form even strips by hand is nearly impossible.
Tips For Using A Jerky Gun
- Keep your meat cold! Cold ground beef will pass through the jerky gun much more accessible than meat at room temperature.
- Go for thinner strips vs. wider strips of beef jerky. They dehydrate quicker and are much easier to form (even using a jerky gun!).
Double or Single Nozzle
If your jerky gun comes with a double flat nozzle (shoots out 2 strips of jerky at a time vs. one), stick to the single nozzle (shoots out 1 strip of jerky). The double nozzles tend not to push out the ground beef consistently, so you’ll get one thick strip of beef jerky and one super skinny one. Jerky strips at different thicknesses will not dehydrate evenly. Plainly said, the thicker jerky strips will need to dehydrate longer, while the thinner strips will dehydrate faster. As an example, here is a picture of the double flat nozzle. You can see that the strip on the right is coming out thicker than the strip on the left.
Loading The Jerky Gun
- When loading a jerky gun, instead of filling the entire barrel at once, push the plunger to the end of the barrel and gradually fill the barrel little by little. If you think of the jerky gun as a tube with a stopper that pushes the ground beef out (forward), push the stopper forward. Now pull the stopper back 2 inches, and fill the first 2 inches with ground beef; pull the stopper back another 2 inches and continue filling the jerky gun this way, little by little, until the tube is full. These steps eliminate air pockets in the ground beef jerky mixture. Air pockets cause the jerky gun to push out the ground beef inconsistently.
- Use a small offset spatula or a butter knife to cut off the flow of the jerky mixture from the jerky gun.
Using The Jerky Gun To Shoot Strips
- My family prefers jerky strips about 5-6 inches long. Instead of shooting the jerky strips out of the jerky gun at this length, we shoot out 10-12-inch strips and then use an offset spatula or butter knife to “cut” the strips in half before dehydrating. This “cut” doesn’t penetrate all the way through, but it makes it easy to break the long strips in half once dehydrated.
Recommended Products
We are a participant in the Amazon Services LLC Associates Program, an affiliate advertising program designed to provide a means for us to earn fees by linking to Amazon.com and affiliated sites.
*Did you make this gluten-free beef jerky? Please give it a star rating and leave an honest review below!
Don’t forget to snap a pic and tag me on Instagram @allergyfreeak and #allergyfreealaska with your pics!









Shirley @ gfe & All Gluten-Free Desserts says
What a brilliant idea, Megan! These turned out beautifully. I know Son would love this beef jerky. 🙂
Off to share ... xo,
Shirley
Megan says
Thank you, Shirley! I'm very pleased that they turned out so well! It's nice to have a cheaper alternative to actual slices of more expensive meat!
xoxo
Joanne Peterson says
Looks like a very good basic recipe. I have not tried making jerky with broth. I will have to try your recipe!
My youngest brother and I have been making jerky for years using ground beef, beefalo, or venison. I have a Nesco/American Harvest and my brother has an Excalibur. I use the ground meat method, my brother uses the jerked, cut of meat method. He makes very delicious jerky that I have not been able to master as well as he does, he just has a touch.
Thank you for the lovely recipe Megan.
Blessings,
Joanne
Megan says
Hi Joanne,
Beefalo (what a cool name)? I'm guessing that's a mix of ground beef and bison? What do you normally season your jerky with?
Some people just have that touch, don't they? Kind of like a mom's cooking... no one can duplicate it! 😉
Thank you -- and you are so welcome!
Hugs,
Megan
Joanne Peterson says
Beefalo is an animal that is bred to be cow and bison/buffalo. (I know we don't have true buffalo here in North America) The flavor is rich and beefy. The farmer raised them grassfed. I found out about this through the CSA I belong to. Sadly, he has had to retire, and no one wanted to take over the business.
Five pounds of meat will make approximately one pound of jerky. I use gluten free soy sauce (San-J), and salt. I think the soy adds a depth of flavor. This is one way:
1/4 cup Soy Sauce
3 Teaspoons Salt
Salt free Chili powder blend from Frontier Herbs to taste (2 Teaspoons)
2 Teaspoons Onion Powder
2 Teaspoons Garlic Powder
1 Teaspoon dried Oregano
2 teaspoons fresh ground black pepper
Mix well, and put in the jerky gun, and do three shots. Dry on low around 110 degrees until dry and pliable, it depends on the humidity in the house. I do low for the enzymes in the food.
I also have done the soy sauce, salt, 4 Tablespoons of Maple Syrup, and sometimes add the onion and garlic or not for the salty/sweet and the black pepper. This takes longer to dry and also I use a little higher temperature 125 to 135 degrees to assure good drying.
My brother brines the meat in a gallon of water, 8 ounces of salt and weigh it down for 12 hours. Dry it off well and then proceed with the sprinkling the meat on both sides, sometimes he uses molasses.
A good resource to learn that my brother gave me is: Don Holm's Book of Food Drying, Pickling, and Smoke Curing. By Don and Myrtle Holm. He grew up without refrigeration and this is the things he learned and his family did to have food on the table that would not spoil.
Hugs,
Joanne
I if I am drying
Megan says
So interesting! Thanks for sharing the information on the beefalo - and your recipe! I'm always curious how others like their jerky. There are lots of great recipes out there. I'll have to check out that book too. Again, thanks for the tips, Joanne! 😉
xo,
Megan
Laura @ Gluten Free Pantry says
What a tasty snack Megan and one that won't break the bank 🙂 I love the addition of liquid smoke to this recipe-such great flavor!
Megan says
I do too, Laura! Liquid smoke is magical! 😉
xo
Judith says
I would really like to try this but don't have a dehydrator. Is it possible to make in an oven?
Thanks!
Megan says
Hi Judith,
I think it would do okay in an oven on the lowest temperature possible (mine goes down to 170 degrees F), but I haven't tried it so I can't say for certain.
Megan
Dan M. says
I bought a Cosori dehydrator Model # CFD-N051-W $49.99 at Amazon 5 weeks ago. I've used it 1/2 dozen times already. Have my 2nd batch of ground beef jerky marinating right now in the fridge. Have also dried bananas and apples several times. It has a timer and you can set the temperature with 1F degree increments all the way up to 165F. I tested it with my Rubbermaid commercial thermometer at that setting and it topped out at 170F! They say 165F is best for safe to eat jerky.
Thanks, Meghan, for this information on ground beef jerky. There's a bunch of great tips here I haven't seen anywhere else!
Mēgan says
Hi Dan! I'm glad you've found this post helpful! 🙂
Jennifer says
Thank you so much for this recipe! I would never have thought to try making jerky with ground meat. (I'm not too good at thinking outside the box). We are blessed to have a source of grass fed free range ground beef and have quite a lot this year. I will definitely try this.
Megan says
You are so welcome, Jennifer! Enjoy it! 😉
Linda says
Megan, I love this idea. Gluten-free son and I both like to have jerky for on the go protein. I only wish I had the equipment to make this properly! I'm not ready to buy a dehydrator, but I might try it in the oven.
Megan says
Thanks, Linda! If you do try it in the oven, please share your results! 😉
Louise says
Megan, I love your site and have shared it with many friends. This is the first time I see something on it that I am nervous about: is liquid smoke not a dubious ingredient? I really appreciate your comment on this.
Megan says
Hi Louise,
Excellent question, thank you for asking! Wright's Liquid Smoke is gluten-free. Wright's has stated this on their website..
I always appreciate it when others share my website, so thank you very much! 😉
Megan
rebecca says
I'm not gluten free but I don't like to add artificial or chemical flavoring I substitute sesame oil for liquid smoke (it doesn't take much) but it does need a very low temp to keep the flavor. It adds that smokey flavor in a more natural way.
Holden says
Liquid smoke is natural . It’s just condensed wood smoke . You just have to find a good brand of it. Hope this helps ?
bj says
We love beef jerky...your recipe sounds amazing.
Megan says
Thank you, BJ!
Miz Helen says
My Sons just love Beef Jerky and this will be a great recipe for them. Thanks so much for sharing with Full Plate Thursday and have a great weekend!
Miz Helen
Jon says
That looks like something i can manage and the results look really nice. Thanks for the tip about keeping the meat cold, i will remmeber that. I cant wait to give it a go.
Megan says
Thanks, Jon! I hope you enjoy it!
amber says
Hi Megan,
This is the most amazing idea!!!! I am going to try this asap!
My Gramie used to make homemade beef jerky and it was delicious but so tough. Beef jerky tends to really hurt my jaw. So I cannot wait to make your recipe..
Featuring this week on AFW!!!
Hugs
--Amber
Cindy (Vegetarian Mamma) says
Thanks for linking up at our Gluten Free Fridays party! I have tweeted and pinned your entry to our Gluten Free Fridays board on Pinterest! 🙂
Hope your week is great! Can't wait to see what you link up this week!
Cindy from vegetarianmamma.com
Stella S says
Hello Megan,
LOVE, love, LOOOVE this recipe! <3
My quest for feeding my family healthier led me to finally buy a dehydrator with my Christmas money. The second thing I made in my new dehydrator, was this recipe. OMG
My husband and two older teen boys were skeptical when I talked about "the new ground beef jerky recipe". (Uh, Mom, you can't make jerky from ground beef...) And I usually make the recipe as it is written the first time; BUT, I was in a hurry to try out the dehydrator, and had to omit the liquid smoke and beef broth, subbed in some Trader Joe's smoke seasoning, and water for the broth.
Holy cow! Even with my subs, my guys inhaled it and asked for an immediate repeat!
I had already bought the same jerky gun, used the wide strip for the first batch, and used the narrow strips for the second. My guys also like the narrow strips better. The jerky gun is the bomb! I will have to order on line for the liquid smoke. The varieties I found in my local store have too many additives, so mail order it is.
@Joanne, thanks for sharing your recipe as well.
BTW, my dehydrator cost less than $60. I debated for ONE YEAR whether or not to get one. If you are on the fence trying to decide, don't wait any longer! If you are looking for a way to get healthy meat protein, this jerky recipe alone will change your life. It is that good.
Thanks for reading my lengthy comment, but I'm on such a high from this success!
(I just love when you discover a winner)
Louise says
Stella, could you tell me what jerky gun you bought. I've been making the strips by hand and it takes a lot of time.
Much appreciated!
Louise
Megan says
Stella,
You're comment made my WHOLE day! I'm so happy to hear this recipe was a hit with your family! Thank you so much for taking the time to comment. 😉 And thank you for the substitution information too, I'm sure other readers will find it helpful.
Hugs!
Megan
Stella S says
Like I said, I get such a high when I discover a new recipe that works for my family. I'm glad my comment made you happy! (happy is good :-).
In regards to the jerky gun, @louise, the link Megan posted is the same one I have.
I went and bought the cheaper version because I wasn't too sure if I would even like dehydrating. One negative aspect I keep reading about it is that the plastic it is made out of is very brittle and will break easily. So, I'll keep using the cheaper one until it breaks, then I'll invest in a metal gun.
I haven't had a chance to search your site Megan, but do you have a fruit leather recipe that I could use?
Megan says
I don't have a fruit leather recipe posted yet. I keep experimenting with them though- just haven't come up with a solid, consistent enough recipe worthy of posting. 😉 Hopefully soon!
Kathy says
Megan, what brand of dehydrator did you buy?
Kathy says
Oops, I mean Stella!!!
Suzanne says
Hi all,
If making in your oven just use the gun to make long strips on cookie sheets. Use the lowest temperature and prop a jar lid on the side near the top of the oven door so the oven is slightly open and allows the moisture to leave the oven. What I love about this method is clean up is easy and you can form super long strips and then cut them up later. I have a food dehydrator as well so when I make jerky I do very large batches using both the oven and the dehydrator. I freeze jerky using snack size bags (which I store in the freezer to reuse for the next batch) This way we can just grab a little bag for school or work if we wish.
Megan says
Great information, Suzanne! Thank you for sharing! 😉
Anna says
Ive made this a few times now, a hit in our family! We used deer meat from hunting season. I omitted the beef broth ( wasnt sure why it needed to be there) and used 3qts if meat with the spices suggested. Yum!
Kat says
Actually we can get buffalo here in North America...it's hard to find and relatively expensive. My ex-boss and here husband last year butchered both their "buffalo" and they had never been crossed with cow.
F says
Actually, most buffalo nowadays have a small amount of beef / cow blood in them.
Sort of like my many friends who all have a "small" amount of Indian blood in them and they are blonde haired, blue eyed... you'd never know, despite it. It's just been so far out, that it's mostly gone, but nonetheless, most buffalo still have minor amount of our domestic cow lines in them.
Now if you are crossing them again together today with our buffalo and a cow, then it's a beefalo 🙂
Sorry, biology major, had to chime in.
Benji Two-Spirit says
I made this recipe using ground turkey. It was amazing and the flavor reminded me of my childhood. My friends at work are begging me to make some more. I'm going to be making a big batch this next week before I go hiking in the rockies. Thank you for using an old fashioned simple recipe for a delicious classic.
Jillian says
I made this and it is soooo yummy!
joanna says
I made this yesterday and it is the best beef jerky I've ever had. Seriously. It has the perfect texture and chew and is not tough like some of the other recipes I've made. This will be my go-to from now on!! I had no idea ground beef would turn out so good as a jerky! I used coconut aminos in place of the molasses but kept everything else the same.
Nayab says
Hi Megan,
How long would you say this 90/10 ground beef would last at room temperature before going rancid? Also how do you store it?
Thanks
Megan says
Hi Nayab,
Storage directions are included in the recipe directions - check out #7. 😉
Sam Glancy says
Is there any way to make it last longer without refrigeration? For backpacking?
Megan says
Hey Sam,
Maybe if you dehydrated it for longer (to cook the meat more). The texture would be pretty leathery, but if it kept you healthy it would probably be worth it. 😉
Megan
Kirsten says
Just put some of this in the dehydrator, only I changed the recipe a bit. I didn't have liquid smoke or broth handy, so I skipped the broth and used smoked sea salt instead of the plain salt. Excited to see how it turns out. Thanks for the recipe!
Julie says
Weird question. Can you possibly turn this recipe into a bigger log and slice it like pepperoni. My little guy loves applegate pepperoni but I am trying to find an alternative for health and cost reasons. Thanks!
Megan says
Hi Julie,
Not a weird question... just a unique one! I think you probably could turn this into a big loaf, but I would mix the meat (omit the beef broth), and then refrigerate it for at least 12-24 hours. Bake the log (in the oven) at 200 degrees for 8-10 hours. Granted, I haven't tried this, but if I were going to, that's where I would start. 😉 If you are going to try it, I'd start with a half batch, then you can test the recipe and see if you like it and if it turns out well - that way you're not wasting 3 lbs of meat the first go-around. Once you have your recipe solid, then double the batch. I hope that's helpful!
Meredith Massey says
I loved this recipe! I made it yesterday and just shared the jerky with people at work. Everyone loved it.
I use My Fitness Pal and am wondering how I should divide up the servings. I think the molasses and the liquid smoke are going to be negligible. Have you ever calculated the nutritional value of this snack?
Thanks again for the recipe!
Megan says
Hi Meredith!
I'm happy everyone enjoyed these! They are certainly a favorite in this house. 😉
I have never calculated the nutritional value. You could certainly do that in a calorie counter.
Jeremy says
I made this recipe a couple weekends ago. I absolutely love it! I have been making a lot of jerky lately and so far this is the best. I have been using flank steak, "ready-to-eat" smoked flank steak (which turned out really Salty, not recommended), and top round steak. Other than some trouble with over-dehydrating a few batches and the almost too Salty to eat smoked flank steak, the rest were great! But I never expected ground beef to turn out so amazing 🙂 The texture was perfect, and the flavor was too! I went with the lower amount of salt and used Canning salt instead of sea salt. Tonight I am making another batch, but I added 1.5 Tbsp of Dean Jacobs hot Chipotle seasoning. I like a little heat to my jerky. We'll see how it turns out
heartweed says
I just received this email form Wrights liquid smoke. .....Thank you for your email. The apple flavor in our Wright's Apple Wood Liquid Smoke contains ethanol, apple essence, water, and proprietary natural flavors. The maple flavor contains propylene glycol, natural smoke flavor, and proprietary natural flavors.
Yikes ....propylene glycol?
Ande says
Megan,
I am looking for a meat that my kids can take in their lunches to school and I am afraid to send things that have to be cold. I am looking for a jerky recipe to solve this problem. I do have a couple questions. Why does the meat have to be so lean? Also what is the purpose of the smoke or is it just for flavoring? Thanks!
Megan says
Hi Ande,
If the meat isn't lean, your dehydrator fills with grease - just trust me on this, it's a mess you don't want to clean up! As for the smoke, it's strictly just for flavor. Feel free to leave it out if you'd like, it's still delicious without it. 😉
Megan
Susan Carter says
Hi Megan, I always wanted to try out a jerky recipe in the dehydrator. Love to use a dehydrator recipes. I am printing this page by the way.
And I will be preparing it today, will let you how it turns out. I will recommend you to my readers 🙂 .
Nancy says
This is a GREAT Jerky recipe!! We love it and will be making more today!
My sons and I have similar health concerns/issues as you talked about in your blog. I have recently gone no grains, no sugars, no soy, no peanuts or peanut "relatives",--pretty much a Doug Kauffman Phase One diet. Feel so much better.
Thank you for the posts. Following you for more great ideas!
God Bless,
Nancy
Geoff Officer says
Hi . I am making ground beef jerky today using a jerky gun AND my oven . Do not have a dehydrator. I just wanted to pass along a bit of information about how i learned to use an oven. For years i used an old fridge outside with a hot plate on the bottom for a smoker. but recently decided to use the oven. and i have switched from bottom round roasts to lean ground hamburger. using recipes online i use my jerky gun to make strips , not rounds. I found two more matching racks for my oven in a recycling place and now use three . i also found three finer grated racks which i place on top of the existing ones so as food does not slip through. here is my trick. my lowest setting is about 200 degrees. so, after filling three racks , top, middle and bottom, with tin foil under the element, i leave the door open enough to insert a hair dryer at an angle to ensure that the heat swirls around inside enough to get at all three grills. one hour is all i need at 200. i did this with bottom round, and i am still doing this with lean ground.
set your hairdryer on warm and on low speed. and turn your oven light on to keep checking on it. you can usually tell when it is close to being done by the color.
enjoy. Geoff
Linda says
I am dying to make this and this sounds delicious.. have you tried ham and bacon yet?
Megan says
Ham and bacon? Like mixed into the ground beef? Is that what you're asking?
Mst. Salamun Kawla says
I never heard about this. BTW, looks awesome this recipe .. hope my son like this. i will cook this today
chenele says
Hi Megan, I love your blog and the effort you put into it in serving your readers.
Now that I've said that..
I used to buy this from a guy in my neighborhood, although he doesn't use dehydrator to make his own. Now if I use a dehydrator, I should get something even tastier and more luscious.
Michael Riley says
I use this recipe without the molasses, smoke, and broth, in an excalibur and really like it. One trick I use for reducing the work, which is important because I make 9lbs at a time, is to flatten a 1 lb sheet per tray on parchment and use a pizza cutter to score it before putting it in the dehydrator. When it's done, I snap the pieces apart. I score it once in half, then about 12 strips the other way. It gives me about 24 pieces per tray.
Shannon says
Worked out in my convection oven, 170 degrees. Didn't use a handy tool, just shaped them like breakfast sausages. Cooked them 8.5 hours since they were not flat and a bit larger.
Kenny says
I want to try this, looks delicious! Just curious as to why you didn’t use any cure salt, doesn’t that kill the bacteria and make it safer to eat when making jerky
Mēgan says
Hi Kenny,
Thank you! I wanted this recipe to be manageable with ingredients people often have at home. 😉
Antoinette says
@Mēgan, I added 3/4 tsp curing salt (easily ordered online and was delivered next day) and used 3 tsp sea salt. Worked out great.
Max says
I use a rolling pin and then cut into strips with a pizza cutter.
Mēgan says
Sounds like a great alternative! Thanks for sharing, Max!
Ken Cissel says
I don't have a jerky gun but have had great success in very consistent jerky strips. I use two bamboo skewers held parallel on a plastic cutting board and then use my butcher knife to spread the beef between the skewers to a very even thickness. If I pay attention then one side is perfectly even up against the skewer, and I trim the end square, cut across the other side to get my desired length, and then cut it into about 1-inch strips and use the knife to transfer them to the racks. It always starts off slow but only takes about 20 minutes to cut out all the jerky from a 2.5 pound batch and they are very even in size and thickness which makes for more uniform drying.
Mēgan says
Hi Ken,
Thank you for sharing your method with us!
Walter says
I’ve been making my own jerky for about 40 years now and I’ll say it: You have a good recipe!
I misplaced my jerky gun about 15 years ago and now I just roll my prepared beef into meatballs and squash them flat on a plate before putting them in my good old Ronco dehydrator!
Mēgan says
Thanks Walter! I'm happy to hear you say that. 😉